Friday, June 27, 2008

Work Item Customization tidbits: System fields (part 5 of X)

Today I would like to talk about system fields that must be present in every work item.

All of those fields have refname System.XXX and are available for any Microsoft Work Item template (both in CMMI and MSF templates). They represent minimal recommended subset of fields that any custom work item template should contain. Having such common subset allows reusing basic WIQL queries or reports from pre-defined templates with your custom templates.

You will notice that for most of those fields the ability to customize their behavior is extremely limited (except for UI-related properties). This is an important limitation one should be aware of when designing custom templates; usually you will just duplicate logic and definitions available in out-of-the-box WI templates for those fields (and that would be a recommended approach since there are almost no supported behaviors to apply anyway).

Let’s have a look at system fields by the category:

Core fields

Those are the fields that you will never update through UI, and in most cases will use only for WIQL queries or reports

  • ID - unique (across TFS Server) ID for the work item, that gets assigned when you create work item
  • Team Project - Team Project that work item belongs to
  • Work Item Type - Work Item Template name that was used to create a work item
  • Rev - work item historical revision (for newly created WI it is 1, and gets incremented with every change)
  • Linked artifacts count fields provide number of artifacts linked to the WI. The following fields are available: Attached File Count, External Link Count, Hyper Link Count, Related Link Count

You do not need to define any of those fields in your WI template (with the exception of ID field); they will be available for queries on any WI template you create.

As a footnote, it is worth mentioning that attachments and links do not have corresponding fields; you just place an appropriate control in UI and magically attachments/links become supported. The only fields related to this functionality are custom Count fields mentioned above (that means no linking queries are supported in current version; this is killer feature coming up in the next version of TFS).

Special behavior fields

Those fields have specific behavior associated with them, with this behavior being  part of the WI template definition syntax and either having dedicated customization mechanism (e.g. State field) or no customization available (e.g. for History field only UI properties can be changed).

  • State – the state field values and behavior are defined in WORKFLOW section; the only general behavior that can be applied to state field is READONLY (i.e. state may be set read-only depending on certain condition, and thus WI status cannot be changed)
  • Reason – the reason field values and behavior are also defined in dedicated WORKFLOW section; likewise the only generic field behavior supported is READONLY
  • History - the field contains the history of WI (each entry contains all fields changed, timestamp and optional comment). The only usage is to display it in WorkItemLog control; no rules can be defined on this field and basically it is display only
  • Area Path - the field represents assigned area. Area path can be displayed only in WorkItemClassification control, and supports only limited subset of generic field behaviors
  • Iteration Path - the field represents assigned iteration. Iteration is also may be displayed only in WorkItemClassification control, , and supports only limited subset of generic field rules

Audit fields

The auditing fields are usually updated automatically and are read-only in UI (though this behavior can be customized, generally it is not a good idea):

  • Created By/Created Date - the user that created WI and creation date
  • Changed By/Changed Date - the last user that changed WI and change date
  • History field can be also considered an audit field, but its behavior cannot be modified (history is always updated automatically).

Data fields

The data fields are the fields that are usually present in any work item template, independent of work item purpose. Indeed, any work item will have short/long text description and person responsible for that unit of work:

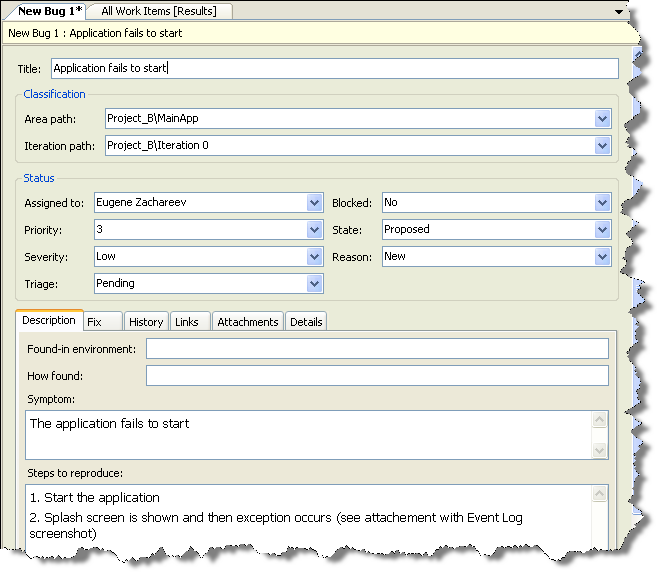
  • Title – work item title
  • Description – work item description
  • Assigned To – currently assigned user

As a conclusion, it is important to note that those common fields already defined in data warehouse so in addition to WIQL you can perform reports on them without any additional setup.

Related posts:
- Work Item Customization: user interface (part 4)
- Work Item Customization: state transitions (part 3)
- Work Item Customization: conditional field behavior (part 2)
- Work Item Customization: fields definition (part 1)

Thursday, June 26, 2008

Advanced workspace cloaking in TFS 2008

I stand corrected (thanks Richard!); there are two new workspace mapping features available in TFS 2008: wildcard mapping and root level cloaking.

The advanced cloaking schema supports scenario where the high level folder is cloaked, and some of the sub-folders are explicitly mapped. It is useful in the scenario where you need contents of one folder out of say, hundred (alternative would be to map high level folder and cloak ninety-nine sub-folders).

The application of this mapping schema is somewhat tricky (and initially it got me thinking that the feature ended up outside of the RTM version) – the cloaked folder must have higher level folder mapped.

That is the following will not work (displaying error “The item XXX may not be cloaked because it does not have mapped parent”):

tf workfold /cloak $/Project/Src /workspace:Test
tf workfold /map $/Project/Src/Bin c:\Project\Src\Bin /workspace:Test

To make it work you need to have the following setup:

tf workfold /map $/Project c:\Project /workspace:Test
tf workfold /cloak $/Project/Src /workspace:Test
tf workfold /map $/Project/Src/Bin c:\Project\Src\Bin /workspace:Test

In this last example, recursive get latest in Test will get all files and sub-folders under $/Project, except for $/Project/Src sub-folder. This sub-folder will be cloaked and only files under $/Project/Src/Bin will be retrieved.

Wednesday, June 25, 2008

Wildcard workspace mapping syntax in TFS 2008

Just a footnote on workspace mappings in TFS 2008 – while initially there were couple of features planned for Orcas release, only one feature has made it into RTM. Correction: both features are available, see this post discussing the second feature.

In TFS 2008 it is possible to map only one level of the folder hierarchy using wildcard syntax

tf workfold /map $/Project/Source/* c:\src\Project /workspace:SampleWorkspace

The mapping above will map only one level of files and folders under $/Project/Source and will not retrieve files contained in sub-folders.

This syntax is nice to have, though I am not sure how useful it is. The same effect can be achieved by using cloaking on sub-folders (though of course wildcard is much more elegant way).

Tuesday, June 24, 2008

Automate workspace creation with MSBuild

And now as promised I shall script workspace creation. I will use MSBuild for this exercise (since it is way better looking and more convenient than batch files, and more standard than PowerShell); if you shied away from MSBuild previously may be it is time to get better acquainted :)

The task at hand is pretty simple: create new workspace and define set of mappings as specified per script; the user will pass workspace name and root folder for the mappings as an arguments to the script.

I will use tf command-line client with workspace and workfold commands for the purpose [while there are CreateWorkspace MSBuild tasks shipped as part of VSTS 2005/2008, they are not suitable for the purpose as the mappings cannot be specified as parameters to the task; 2005 version uses XML file and 2008 version uses Team Build database].

One thing to note before going into further details – when you use tf workspace /new to create a workspace, the default mapping is created (yes, no one asked for that, but tf does so nevertheless). That necessitates removal of that default root mapping as a first step after workspace creation.

So here goes the script (it is a longish one, but it is pretty self-descriptive):

<?xml version="1.0" encoding="utf-8"?>
<Project DefaultTargets="CreateWorkspace"
  xmlns="http://schemas.microsoft.com/developer/msbuild/2003">
  <!-- Default values for the properties the script  uses -->
  <PropertyGroup>
    <RootPath></RootPath>
    <WorkspaceName></WorkspaceName>
    <Tf>tf</Tf>
  </PropertyGroup>
  <!-- Workspace mappings to create -->
  <!-- Customize at will -->
  <ItemGroup>
    <WorkspaceMapping Include="$/Project1/Source">
      <LocalPath>$(RootPath)Source</LocalPath>
    </WorkspaceMapping>
    <WorkspaceMapping Include="$/Infra/Bin">
      <LocalPath>$(RootPath)Common</LocalPath>
    </WorkspaceMapping>
  </ItemGroup>
  <!-- Main target -->
  <Target Name="CreateWorkspace">
    <!-- Checking input parameters -->
    <Error Condition="$(WorkspaceName) == ''" 
          Text="Please specify WorkspaceName property"/>
    <Error Condition="$(RootPath) == ''" 
          Text="Please specify RootPath property"/>
    <Error Condition="!HasTrailingSlash('$(RootPath)')" 
          Text="Please make sure RootPath is slash terminated"/>
    <!-- Create new workspace-->
    <Exec Command="$(Tf) workspace /new /noprompt 
                    &quot;$(WorkspaceName)&quot;" />
    <!-- Remove default mapping -->
    <Exec Command="$(Tf) workfold /unmap 
                  /workspace:&quot;$(WorkspaceName)&quot; $/"/>
    <!-- Create new mappings (uses MSBuild batching) -->
    <Exec Command="$(Tf) workfold 
                /map &quot;%(WorkspaceMapping.Identity)&quot; 
                    &quot;%(WorkspaceMapping.LocalPath)&quot; 
                /workspace:&quot;$(WorkspaceName)&quot;"/>
    <!-- Great success! -->
    <Message Text="Workspace '$(WorkspaceName)' created sucessfully"/>
    <!-- List created mappings -->
    <Exec Command="$(Tf) workfold 
                /workspace:&quot;$(WorkspaceName)&quot;"/>
  </Target>
</Project>

To execute the script, fire up “VS 200x Command Prompt” and type the following:


msbuild CreateWorkspace.proj /p:WorkspaceName=VistaDevt /p:RootPath=c:\Vista\


Only caveat is that the folder the script located in cannot be mapped anywhere (as I noted above, tf workspace /new will try to map it and will fail).

If you are convinced that using script to create workspace is better than typing in the mappings, CreateWorkspace.proj is available for download here.

For completeness sake, it is worth mentioning /template argument of tf workspace command. If you want to copy somebody else’s workspace it is pretty attractive choice (or if you do not want to remember that somebody’s workspace name and AD user name, you can use Workspace Sidekick UI for the same purpose)

If you want to have “single-click” build, you may want to add to this script a) getting everything once workspace is created and b) building everything once get latest is finished. MSBuild makes both tasks very easy to achieve.

Workspace mappings best practices

Recently, I was asked if there are any best practices when defining workspace mapping. While I did not have any ready best practices, after some careful (late evening) thought I came up with several “best” practices that seemed worth sharing.

In ideal world, one would have a single mapping in a workspace. However in most projects single folder will either contain too many items or only part of the files required for specific project development/build.

In the former case, it is possible to cloak the redundant folders and thus optimize the time required to get files (cloaking folders excludes them and all their contents from get operation).

In the latter case, there is no escape but to map several folder in one workspace. Generally, there is no problem (other than managing multiple mappings) with this scenario; but the multiple mappings require certain degree of common sense, as illustrated in the example below. 

Consider the following folder structures:

 $/
Project1
Sources
Common
Bin
 $/
Project2
Sources
Bin

Let’s suppose the following set of mappings get created in a workspace:

 $/Project1/Sources -> c:\src\Project1 
$/Project2/Sources/Bin -> c:\src\Project1\Common\Bin

In generally, this setup is perfectly valid and works fine, but two folders hierarchies above have some common folders between them when mapped; namely, $/Project1/Sources/Common/Bin is implicitly mapped to the same local folder that $/Project2/Sources/Bin is explicitly mapped to.

Can you guess what will happen when “get latest” is performed on that workspace? Let me tell you what will happen (I failed the test myself) – only explicitly mapped folder contents will be retrieved from source control.

That said, here are my top five best practices on workspace mappings

1. Minimize number of mappings in single workspace. The more complexity is there, the more mistakes end users will make. Take that into account when you design state-of-the-art CM process that requires 50 workspace mappings per project

2. Map all related folder in single workspace; do not mix - create another workspace for every related subset of folders. Giving the workspaces descriptive names and making sure the mappings under workspace related to the name will save you a lot of time, especially when you switch between multiple projects daily

3. Cloak sparingly and only when performance is affected. The same complexity rule as in 1 applies. In my experience, cloaking is appropriate only in few cases, and when it is required it is usually a sign of certain problems with folders structure in the source control repository (not to mention that you will have to explain cloaking to end users)

4. When defining multiple mappings to create complex folder structure, make sure the folders with the same name from different mappings are not mapped to the same location. The discussion above is the basis for that rule - do not be afraid to create local hierarchy using mappings, but put some thought into it. I usually use that kind of mappings for external dependencies (and works pretty well), for example

 $\Project\Sources -> c:\src\Project 
$\ThirdParty\Component\1.1\Bin -> c:\src\Project\Bin\Component
$\Infrastructure\Ongoing\Bin -> c:\src\Project\Bin\Infrastructure

5. If you have more than three mappings per workspace, automate workspace creation.  This one is a topic in its own right and deserves a blog post – but in a nutshell, just consider how are you going to set up workspace mappings on your co-worker machine

Saturday, June 21, 2008

Work Item Customization tidbits: user interface (part 4 of X)

In previous posts I talked about how to define WI fields, fields behaviors and states/transitions logic. Now it is time to talk about how work items UI is defined.

Let’s start with a small example:

<Form>
<Layout>
 <Group>
  <Column PercentWidth="100">
   <Control Type="FieldControl" FieldName="System.Title"
            Label="Title:" LabelPosition="Left" />
  </Column>
 </Group>
  …
 <TabGroup>
  <Tab Label="Description">
   <Control Type="HtmlFieldControl" FieldName="System.Description"
            Label="Description:" LabelPosition="Top" Dock="Fill" />
  </Tab>
  …
 </TabGroup>
</Layout>
</Form>

This example shows several important moments. First, all UI elements should be placed under LAYOUT element which in turn is placed under FORM element.

LAYOUT elements may host GROUP and TABGROUP elements. GROUP element groups child elements and may be viewed as “row” element (also optionally it may have a title). TABGROUP element contains one or more tabs (represented by TAB elements with titles). Both TAB and GROUP elements may contain several levels of nested groups.

To organize elements within a group, COLUMN elements may be used. While GROUP represents a row, COLUMN naturally represents a column and must have width specified (the width may be specified either in percents of total width or in pixels). All basic elements (LAYOUT, GROUP, TAB and COLUMN) have a set of common properties such as Padding and Margin.

Those high level elements are used to organize controls representing the work item fields. Typical high-level UI organization of the form consists of several groups on the top part of the form (displaying general fields common to all work item types such as Title, State, Assigned To etc.) and tab control at the bottom part of the form (with tabs hosting work item specific fields). Here is the screenshot of MSF Agile Bug Work Item:


In addition to common attributes (Padding and Margin), every control has the following attributes:

  • Type specifies how the field data will be displayed (to be discussed later)
  • FieldName specifies what field is associated with the control (refname must be used)
  • Label specifies user friendly descriptive text for the control (it may contain & for mnemonics)
  • LabelPosition specifies how the label should be positioned relative to the control
  • Dock attribute may be used to specify how (if at all) the control should fill the container

The way the data is displayed is defined by the Type specified. There are several predefined types of controls:

  • FieldControl supports plain textual or numeric fields and lists of values (depending on the field it is associated with)
  • HtmlFieldControl supports (optionally) rich format text, possibly multi-line
  • DateTimeControl supports formatted date fields

Additionally, there are several special controls (that can be used only for specific data, and usually are displayed on dedicated tabs)

  • WorkItemClassificationControl is special control used to display hierarchical AreaPath and Iteration fields values
  • WorkItemLogControl displays work item history information (and it does not have associated field)
  • LinksControl displays work item links information (and it does not have associated field)
  • AttachmentsControl displays work item attachments (it does not have associated field as well)

With the basic information above in mind, it is easy to understand the example definition: we have Title text box taking the upper part of the form and underneath there is tab control with a single tab, hosting multi-line rich text box that fills the whole tab area.

For the limited set of UI elements available there is surprising number of customizations one can do. But what is one to do if the UI elements available do not answer the WI customization requirements? There is option to develop custom control providing for that custom logic using .NET, TFS SDK and your language of choice (though the development and deployment experience is not as basic as many would like that to be; we shall discuss it later).

This post rounds off the basics of custom Work Item templates definition syntax. Further I will try to touch upon some less explored corners and common approaches in customization.

Related posts:
- Work Item Customization: state transitions (part 3)
- Work Item Customization: conditional field behavior (part 2)
- Work Item Customization: fields definition (part 1)

Thursday, June 19, 2008

A Rule A Day: DeclareEventHandlersCorrectly

In the previous post I have talked about InitializeReferenceTypeStaticFieldsInline rule. Today let us look at "Declare event handlers correctly" DeclareEventHandlersCorrectly rule (CA1009). The rule is triggered when you declare events differently from accepted .NET signature pattern:

public delegate void ActionEventHandler1(String first, String second);
public delegate void ActionEventHandler2(object sender);
public delegate bool ActionEventHandler3();
 
public class EventClass
{
    public event ActionEventHandler1 ActionCalled1; // fires CA1009
    public event ActionEventHandler2 ActionCalled2; // fires CA1009
    public event ActionEventHandler2 ActionCalled3; // fires CA1009
}

The recommended way to declare event handling delegate is as following

public delegate void ActionEventHandler(object sender, ActionEventArgs e);

The points that are different from the code violating the rule:

  • No return value (because with event handler returning value it is impossible to attach several handlers to the event)
  • First parameter is of type object and generally should represent the object that fires the event
  • Second parameter is of type EventArgs or derived from EventArgs and represents event-related data

Why it is important to declare event handlers in such way? I can think of several explanations

  • For consistency with .NET framework. Chances are you are using quite a lot of .NET library classes in your application, and dealing with events in different way just adds unneeded complexity to code maintenance
  • The proposed patterns is flexible enough to handle both change of state within event handlers and custom data to be passed to event handler in uniform manner

From my experience, the custom event handlers implementations that are different from .NET paradigm usually result from lack of knowledge or from the perception that it is "too much hassle to implement custom delegate & arguments". So when you see this violation occurring in the code written by your team, that's probably time for some short education session.

Here are some hints on how to implement .NET event pattern. In .NET 2.0 one can use templated event handler to avoid declaring custom delegates, for example

public delegate void ActionEventHandler(object sender, ActionEventArgs e);
public class EventClass
{ 
    // use templated EventHandler instead
    // public event ActionEventHandler1 ActionCalled;  
    public event EventHandler<ActionEventArgs> ActionCalled;
} 

If you do not have any EventArgs to supply and would like to use event without arguments, the elegant way is to use static EventArgs.Empty:

public class EventClass
{
    public event EventHandler ActionCalled;
    public void PerformAction()        
    {
        // use empty event 
        // ActionCalled(this, new EventArgs()); 
        ActionCalled(this, EventArgs.Empty);
    }
} 

Using event arguments class derived from EventArgs allows explicit specification of event handlers operation contract, for example

public class ActionEventArgs : EventArgs
{
    private bool _suceeded;
    public bool Suceeded
    {
        get { return _succeeded; }
        set { _suceeded = value; }
    } 
    private readonly string _originatorName;
    public string OriginatorName
    {
        get { return _originatorName; }
    } 
    public ActionEventArgs(string originatorName)
    {
        originatorName = _originatorName;
        _suceeded = true;
    }
}

This arguments implementation specifies that

  • Event hanlder is provided with input parameter originator name
  • Event handler may choose to change the event result (by default event handling is assumed to succeeded)
  • If several event handlers are attached, the previous handler result propagates to the next handler

Contrast that with

public delegate bool ActionHandler(string originatorName); 

To summarize, in order to prevent DeclareEventHandlersCorrectly violations, and generally make your life easier while implementing custom events

  • Conform with .NET event implementation pattern
  • Use EventHandler<T>
  • Use EventArgs.Empty
  • Implement custom event arguments to better verbalize event in/out data for the handlers

P.S. By the way, if you are reading this post you may also enjoy reading new David Kean's blog, where he also deals with rules and violations. Highly recommended!

Monday, June 16, 2008

Review Code Metrics your way – in Excel

In addition to filtering function, there is another (almost magical) function in Code Metrics tool window – “Export to Excel”. If you feel more comfortable reviewing numeric data in Excel, or the number of results in code metric calculation is very large (which easily happens even for middle sized projects), you just click on magic button 
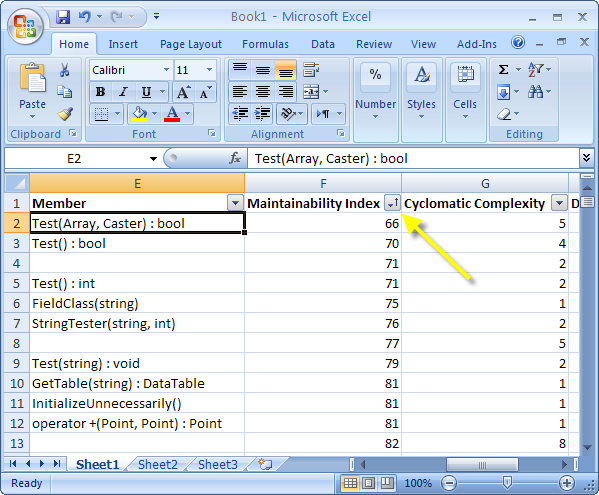
on the Code Metrics window toolbar, and voila! Your results are available in Excel spreadsheet, with advanced sorting and filtering functionality, and graphs, and statistics …

And if you are Excel whiz, you can save historical results over the time and perform historical code metrics results comparison.

Enjoy!

Code Metrics Filter gotcha

A neat way to review Visual Studio 2008 code metrics results (and for large projects the list may become pretty large) is to use built-in filter functionality:

One may select any available column (Maintainability Index etc.) in Filter combo box, and specify Min/Max range. Additional neat feature of Code Metrics window is that all filter ranges applied are added to Filter combo box list, and thus can be easily reused:

The downside of this feature is that once you have applied several filters the combo box list can become pretty long. To remove the custom filters from the list one may clear certain registry entry value, viz. HCU\Software\Microsoft\VisualStudio\9.0\EnterpriseTools\CodeMetrics key, value MRUList) (sorry for not finding more elegant supported way of doing it).

Sunday, June 15, 2008

Configuring check-in policies

One interesting moment to be aware of in custom check-in policies implementation is how to implement the policy configuration. Overall, it is rather easy to implement custom check-in policies and there is a whole lot of documentation available (I especially like and highly recommend excellent article in MSDN Magazine by Brian Randell).

The configuration is initially performed when you define check-in policy; later, the configuration can be performed using “Edit” button in Source Control Settings dialog. Good example of configurable check-in policy is Code Analysis policy, since there user has to specify set of rules applicable in check-in policy evaluation.

When you create your custom policy, you override Edit method from IPolicyDefinition interface to display your own custom configuration dialog. But what do you do with the values specified by the user in the dialog (no matter whether it is elementary type or custom data structure)?

None of IPolicyXXX interfaces you implement in your custom policy provides any special methods for storage or retrieval of configuration. TFS serializes the instance of your custom check-in policy class, so to make sure your custom configuration is available, you need to expose it as the class member variable. Since you policy class  is marked as Serializable, the value will be persisted and available when the policy is evaluated at check-in time.

The mechanism is very simple; only caveat is that you must make sure that any internal variables that are not to be persisted are marked as NonSerializable. Here is small example:

[Serializable]
public class Policy : 
   Microsoft.TeamFoundation.VersionControl.Client.PolicyBase
{
    // Configuration to be serialized – may be used in Evaluate etc.
    private string _configuration;
 
    // Required for internal logic; do not serialize
    [NonSerialized]        
    private _DTE _dte;
 
    //...
}

Now, what if the policy configuration should be global and easily changeable? Then the mechanism above for all its simplicity is not very suitable (since once you change the configuration, the data gets serialized into bowels of TFS and is not readily available). Another problem you might face is the versioning of the policy – since the policy is defined on per Team Project basis, when you release a new version and it contains breaking changes to configuration, you will not only have to redeploy it on all client workstations, but also re-add it in all Team Projects.

What I did in such cases (and mind you, this is only one possible approach) is to make configuration file external to the policy implementation (meaning that policy will only consume the configuration but will not edit it). It may be tempting to make that configuration local, but that will actually make things worse (think about synchronizing configuration across all workstations). The easiest solution I have found so far is to put the configuration files somewhere on TFS server and make them accessible over http (using URL similar to “http://tfsserver01/configuration/policy_v1.xml”). Since in most cases TFS server URI is readily available from insides of check-in policy code, this location can be considered well-known. Of course, you would not want to put any security related data (passwords etc.) in that configuration file, but for most custom check-in policies that should not be a concern.

Using that approach, to change the configuration for your policy, you’d modify the external XML file. It may be one global file, or one per version of the policy or even one per Team Project (depending on your custom logic) – but since it will be external to serialized policy, the configuration is easily versioned and changeable without ever touching serialized data in TFS database.

Saturday, June 14, 2008

Work Item Customization tidbits: state transitions (part 3 of X)

In the previous posts I talked about field definitions. Now it is time to handle work item status (state) definitions, and how the transitions between different states are defined.

The simplest definition of work item with single state will look as following:

<WORKFLOW>
    <STATES>
        <STATE value="Active"></STATE>
    </STATES>
    <TRANSITIONS>
        <TRANSITION from="" to="Active">
            <REASONS>
                <DEFAULTREASON value="New" />
                <REASON value="Duplicate" />
            </REASONS>
        </TRANSITION>
    </TRANSITIONS>
</WORKFLOW>

The definition consists of two parts – list of states available for work item, and list of transitions between states. In the example above, there is only one state defined, and there is single transition from “” to “Active” (where “” means no state and is applicable only to newly created work items). Another thing to note is the list of reasons defined for every transition. The reason field becomes enabled when user selects to state; then the list becomes relevant with DEFAULTREASON selected.

This simple example amply demonstrates how one can specify list of states available, transitions between them and reasons for the transition performed.

While that simple definition can get one by, how about more complicated scenarios – for example, making fields read-only depending on work item state, or setting default values upon transition? As it is, it can be solved by adding FIELDS section to STATE, TRANSITION or REASON elements.

The state-related FIELDS section is similar to FIELDS section describing the fields available in the work item (as we discussed earlier). However, since all fields were specified previously in WORKFLOW we only need to reference fields and provide desired behaviors. For example let’s look at some TRANSITION definitions from Bug WI template:

<TRANSITION from="Closed" to="Active">
 <REASONS>
  <DEFAULTREASON value="Regression" />
  <REASON value="Reactivated" />
 </REASONS>
 <FIELDS>
  <FIELD refname="Microsoft.VSTS.Common.ActivatedBy">
   <COPY from="currentuser" />
   <VALIDUSER />
   <REQUIRED />
  </FIELD>
  <FIELD refname="Microsoft.VSTS.Common.ActivatedDate">
   <SERVERDEFAULT from="clock" />
  </FIELD>
  <FIELD refname="System.AssignedTo">
   <COPY from="field" 
        field="Microsoft.VSTS.Common.ResolvedBy" />
   </FIELD>
 </FIELDS>
</TRANSITION>

We already understand the intent behind the REASONS section - it specifies that bug can be moved from “Closed” to “Active” either because of regression or as it is reactivated. Without concentrating too much on syntax details, the FIELDS section can be easily read: for Activated By field we want to make sure that it is set by default to the user who performed the transition, the field is mandatory and must be set to valid TFS user name. Activated Date field should be set to the time of the transition (since SERVERDEFAULT is performed when WI is saved), and Assigned To field should default to the value of Resolved By field (or in other words, to the person who resolved and closed the issue).

In a similar manner, FIELDS section may be specified for states or reasons (for example, you may want to make sure that certain field is mandatory only in specific state, or that setting specific reason in transition requires additional information [and thus makes certain fields mandatory]).

To round off the topic of WI states, let us talk about the security. The typical requirement for the task tracking system is limiting the users to certain actions. We have previously discussed how the FIELDS logic can be limited based on user groups; can the state transitions be limited in the similar fashion?

Indeed, we can specify optional for and not attributes in TRANSITION element, allowing (and/or denying) access to certain group to certain states. For example, the following snippet allows reopening of the bug only to testers (and explicitly disallows developers)

<TRANSITION from="Closed" to="Active" 
            for="[Project]\Testers" 
            not="[Project]\Developers">
    …
</TRANSITION>

As denial takes precedence, any tester who is also developer will not be able to move bug to “Active” state.

With this post we have rounded off (admittedly in very simplistic manner) most of the “behind-the-scene” logic of Work Item definition. Next I will discuss how the elements are exposed in User Interface using FORM section.

Related posts:
- Work Item Customization: conditional field behavior (part 2)
- Work Item Customization: fields definition (part 1)

Thursday, June 12, 2008

How to reuse FxCop projects in VSTS 2008

One pretty neat feature that is available out of the box in Visual Studio Team System 2008 static code analysis, is the ability to use FxCop project definitions to specify active rules for the analysis. That may be valuable if not all of the developers have VSTS licenses or in case where FxCop is the preferred vehicle for defining and sharing static code analysis rules.

To use FxCop project rules definitions in VS project, add the following two properties to relevant C#/VB.NET projects:

<RunCodeAnalysis>true</RunCodeAnalysis>
<CodeAnalysisProject>MsRules.FxCop</CodeAnalysisProject>
<CodeAnalysisRuleAssemblies>""</CodeAnalysisRuleAssemblies>

This properties specify that
  • Static code analysis should be performed (RunCodeAnalysis)
  • FxCop project file should be used for the rules definitions instead of in-project definitions (CodeAnalysisProject)
  • No additional rule assembles should be used, since FxCop project already specifies the rules libraries (CodeAnalysisRuleAssemblies)

The properties will be used in CodeAnalysis.targets file (located at "$(MSBuildExtensionsPath32)\Microsoft\VisualStudio\v9.0\CodeAnalysis\Microsoft.CodeAnalysis.targets" where MSBuildExtensionsPath32 usually is "C:\Program Files\MSBuild" folder) by RunCodeAnalysis MSBuild target. RunCodeAnalysis target invokes CodeAnalysis task that is responsible for actually running code analysis (and the values for the properties you have defined are passed to the task).

If you use that approach make sure that FxCop project provided in CodeAnalysisProject property does not have any targets defined inside; and don’t forget that all rules defined in VS Project Properties now do not represent rules executed in code analysis.

It is possible to achieve similar result in VS 2005, but that requires modification of Microsoft.CodeAnalysis.targets file (because while CodeAnalysis tasks has the same parameters in VS 2005/2008, those parameters are exposed only in VS2008).

There is another useful MSBuild property available in VSTS 2008 (for clarity named CodeAnalysisTreatWarningsAsErrors); have a look at this post at FxCop blog for details.

Use P&P Guidance efficiently with Guidance Explorer

If you are using Team Foundation Server Guidance document (whether in printed or online form), then probably there are numerous times you have wished for better navigation across this 700 pages document and perhaps also for the ability to bookmark some sections of interest.

Turns out, there is tool released by Patterns & Practices team that does that, and some more! With Guidance Explorer tool you can

  • Navigate through table of contents on by chapter basis
  • Navigate through table of contents by article type (How-Tos, practices etc.)
  • Search for the required contents
  • Create your own "guidelines" from set of published topics
  • Save your favorite contents into Word document
  • Synchronize with P&P online for new guidance content

And when you download the tool, other P&P guidance documents also become available in GE, including of course TFS Guide. Moreover, the tool also allows you to create your own guidelines, that you can author using GE Toolkit and includes Web based UI – read more in GE FAQ.

Tuesday, June 10, 2008

Detecting TFS Server version from 2008 client

With the release of VSTS 2008, in certain configurations you might want to detect what version of the server your client runs against, the important configuration being 2008 client vs. 2005 TFS server, since in that configuration the feature-set on the client will be more restrictive (2005 client against 2008 server is no problem as it will not use any new features anyway).

It turns out that to get this bit of information your best bet is to use Team Build object model (the advise is courtesy of Aaron Hallberg):

IBuildServer buildServer = 
    teamFoundationServer.GetService(typeof(IBuildServer)) 
     as IBuildServer;
if (buildServer.BuildServerVersion ==  BuildServerVersion.V1)
    ; // server is 2005
else if (buildServer.BuildServerVersion == BuildServerVersion.V2)
    ; // server is 2008

If you think about it for a second, it sort of makes sense, since Team Build is the component that differs most between TFS 2005 and 2008 versions. So in the absence of general service versioning model one can use that for determining the server version.

And if you did not know it yet, Team Build object model was greatly enhanced in 2008. One of the recent discoveries for me was the custom properties bag available for builds build types in Team Build 2008 (as described in Aaron Hallberg’s blog). Using the custom properties one could provide custom categories for build types(and perhaps even expose them in Team Explorer). This is something I am planning to take a stab on (if time allows).

For Team Build OM intro there is a detailed post by Martin Woodward (it even has class diagram drawing!); and you can download the whole documentation here.

Updated: Unfortunately, it appears that custom properties I was so enthusiastic about are available for builds only, not for the build types. Thanks to Ed for correction!

Monday, June 09, 2008

Source Analysis for C#: custom rules and more

When community likes something, it really becomes involved – and community likes Source Analysis for C#!

Today, less than a month after the tool is released there is already a lot of community content available (and I do not mean “tab vs space” war blog posts ;).

First, there is series of blog posts on authoring custom rules for Source Analysis tools. While I did not create any custom rules yet, I can attest to the fact that the object model appears quite simple to use (some of it I have used in check-in policy).

Secondly, there is interesting initiative on integrating Source Analysis tool with ReSharper for real-time source code analysis.

And lastly, when you will start thinking about developing your custom rules, read this post on how to unit test your custom rules.

More stuff’s coming!

Sunday, June 08, 2008

Work Item Customization tidbits: conditional field behavior (part 2 of X)

In the previous installment I started talking about FIELDS section definitions. While basics were covered, there are still more advanced scenarios to be discussed; such as making certain field rule/behavior (or group of those) conditional based on user or other conditions.

To scope certain rule for specific users, there are for and not attributes exposed on rule elements. Those attributes accept Team Foundation Server group names; for example changing our example in the following way

<FIELD name="Issue" refname="Microsoft.VSTS.Common.Issue" type="String">
    <REQUIRED for="[Project]\Testers" not="[Project]\Developers"/>
    …
</FIELD>

makes the field mandatory only for the users in Team Project specific Testers group (and optional for Developers). The possible values for these attributes may be Team Foundation Server global groups (such as "Valid Users"), Team Project specific groups or Active Directory domain groups/users. If users from several groups need to be specified, common approach is to create TFS group combining those, and use it in the field definitions.

While giving plenty of leverage in scoping the fields' behavior to user groups, those attributes do not provide mechanism for creating dependencies between different fields' values. That kind of conditional behavior is handled by WHEN* elements; there are following elements available:

  • WHEN/WHENNOT – the elements are used to specify pattern "if field A has value B then …, else …" (however, the wording is somewhat different: "when field A has value B then …, when field A has not value B then …")
  • WHENCHANGED/WHENNOTCHANGED – the elements are used to provide logic similar to WHEN/WHENNOT pair; only the logic is tied to the certain field value changing rather than to the field being set to specific value

WHEN* elements are placed under FIELD elements and are used to group certain rules together for the same condition. The following snippet from the Bug template sets "State Change Date" field value to system time when "State" field value changes, and makes sure that the date field cannot be changed in the meanwhile by specifying read-only constraint:

<FIELD name="State Change Date" refname="Microsoft.VSTS.Common.StateChangeDate" type="DateTime">
    <WHENCHANGED field="System.State">
        <SERVERDEFAULT from="clock" />
    </WHENCHANGED>
    <WHENNOTCHANGED field="System.State">
        <READONLY />
    </WHENNOTCHANGED>
</FIELD>

This conditional logic in addition to basic rules provides a whole lot of flexibility. However, it also adds significant amount of complexity. If we consider rules that affect field values (namely DEFAULT and COPY rules) together with WHEN* conditional formatting, it is possible to create unintended chaining of rules (and the way WIT engine handles the rule logic is not that simple to start with).

That about gives very brief overview of how FIELDS section is defined (with the exceptions of data warehouse integration and global lists to be handled later). Next stop is WORKFLOW section – dealing with states and transitions should be pretty exciting!

Saturday, June 07, 2008

TechEd 2008 through one eye

Believe it or not, but on the second day of TechEd I got some infection in my right eye. So all my impressions from the sessions starting the second day are sort of one-sided J.

Anyway, besides the cool keynote by Bill Gates which I have already mentioned, here are my top picks for TechEd Developers 2008:

  • "How I became a Team Build muscle man" session by Steven Borg totally rocked (just to draw a part of the picture, the session included foam dispenser and vacuum cleaner as instruments for the code quality improvement)
  • Two sessions ("Introduction to Mock Objects and Advanced Unit Testing "and "How Not to Write Unit Tests") by Roy Osherove were very well presented and informative. I wanted to attend Roy's presentation for a long while and was not disappointed. You really want to check out his blog (for more information on mock objects and testing in general) and perhaps his recent book on unit tests
  • Very informative session on "Migrating Extensibility to the Managed Add-In Framework" by Jesse Kaplan. It was an eye-opener to me since managed add-in framework is part of .Net 3.5 that I has completely missed (do you know what is inside of System.AddIn assembly?)
  • Several sessions on future parallel frameworks (both for managed and native) were very informative. Programming for multiple core processors is something to follow closely (as an example, Stephen Toub presented at his session "Parallelize Your Microsoft Visual C++ Applications with the Concurrency Runtime" performance benchmarks for 24-core Intel processor; in my mind that means that in couple of years you might have that in your Dell workstation). And if you are interested in that topic here are two blogs to follow – Managed Concurrency Framework blog and newly launched Native Concurrency blog

And last but not least, TechEd was an awesome place to meet new people (and talk face-to-face with some of the email acquaintances). Overall, the event was excellently organized (just try to set up the conference for six thousand people) and I have enjoyed it very much (though darn that eye thing!).

Tuesday, June 03, 2008

Yours truly at TechEd (day 1)

Here are some impressions from TechEd Developers 2008 – live!

The highlight of the day, keynote by BillG was pretty impressing (including official version of "Bill Gates last day at MS" homemade movie). Of other presentations I saw some are awesome, some are less so – but one big bothersome thing I experienced today I thought must be blogged about (hey, there are there more days to go).

Every presenter must read Scott Hanselman's post on effective presentations, especially 4th point, quote:

"4. For the Love of All That Is Holy, FONT SIZE, People (See that?)"

What's up the fonts, people? Almost nobody changes the font (I do not even mention ZoomIt software).

Please please increase the font size! I cannot read anything (even as I blog) …

A rule a day keeps the doctor away

When I presented on managed Static Code Analysis lately, I was asked (and not for the first time) how good the Static Code Analysis is at finding bugs. Before answering the question it is always necessary to clarify: "What do you mean by bugs?"

The problem with the "bugs" question is that "bug" is very generic term. Bug may originate from incorrect usage of your custom framework classes – while it is a bug, it still may be perfectly valid managed code (valid in a sense that appropriate language constructs and .Net framework classes are used).

Static Code Analysis tools currently are mostly concerned with validity (as defined above) of the code; so they will assist you in finding (potential) problems related to code quality, but they will not help you with the issues specific to your design (and frankly, how could you blame them for that?).

That said – how valuable is the generic "code quality" vs. design specific bugs? Should one bother with those tools at all? I am convinced that there is value in the automated static code analysis tools; and to drive that point home I decided to start showcasing some of Microsoft Static Code Analysis rules. I am not promising to maintain rule-a-day pace, but I will try my best.

So for starters let us have a look at "Initialize reference type static fields inline" InitializeReferenceTypeStaticFieldsInline rule (CA1810). The rule is triggered by the reference type declaring static constructor as shown below:

public class RuleViolation
{
    private static Hashtable _values;
 
    static RuleViolation()
    {
        _values = new Hashtable();
    }
}

The suggested approach is to initialize static fields inline

public class NoRuleViolation
{
    private static Hashtable _values = new Hashtable();
}

The rule is labeled as Performance rule and the rationale behind it is as follows: the explicit static constructor is expensive, since when one is declared the MSIL code will have to implement a check whether this constructor is called as a pre-requisite for every static member is accessed. On the other hand, when fields are initialized inline, static constructor gets generated by the compiler and gets called only prior to the fields initialization, so that the static fields' initialization is guaranteed to occur before they are accessed (and no check is performed for static methods).

Interesting part of it is that the inline initialization is achieved by compiler in MSIL by setting beforefieldinit flag on the class definition; and it turns out that it may have some side effects (viz., if the static method indirectly depends on static field initialization, it is not guaranteed that the field initialization routine is called when static method is executed). For those that are interested in understanding that in depth, there are couple of very interesting articles on the topic (one by Satya Komatineni and another by John Skeet).

So what's going on? The rule tries to improve performance and instead you may end up with additional problems? Well, that really depends on how one fixes the rule violation. My take on this rule is this – static constructor to me is less about performance and more about correct implementation. Let me elaborate.

When static methods are implemented in managed code, in all probability the code either provides some utility methods or implements a singleton. Since utility methods should not have any state, the rule is not applicable to this situation. What about singleton? It will have internal state and there the rule may be applicable.

If the code violating the rule is singleton implementation, it is naïve and flawed one. To give an example of the implementation that triggers rule violation


public class ConfigurationManager
{
    private static string _configurationValue1;
    private static int _configurationValue2;
    private static DateTime _configurationValue3;
 
    static ConfigurationManager()
    {
        // in real code - reading from storage
        _configurationValue1 = "value1";
        _configurationValue2 = 1;
        _configurationValue3 = DateTime.Now;
    }
}

If the above is flawed singleton implementation, can we fix rule violation and also improve on design? If instead of just initializing fields inline we rework the implementation, both objectives may be attained:

public class ConfigurationManager
{
    private string _configurationValue1;
    private int _configurationValue2;
    private DateTime _configurationValue3;
 
    private ConfigurationManager()
    {
        // in real code - reading from storage
        _configurationValue1 = "value1";
        _configurationValue2 = 1;
        _configurationValue3 = DateTime.Now;
    }
 
    public static readonly ConfigurationManager Instance = new ConfigurationManager();
}

The "good" singleton implementation has only one static field, so field initialization problem for static methods mentioned above is irrelevant. And it does not have potential performance penalty of static constructor as well (since there is no explicit constructor). And finally, the implementation becomes cleaner and more universal than the previous one (since all it does is to uses additional plumbing on top of the ordinary class).

Thus to conclude, violation of InitializeReferenceTypeStaticFieldsInline rule probably gives a signal about design flaw in the implementation, viz. of singleton implemented as class with static fields/properties/methods. The resolution of that violation would be to redesign the class (in such manner that it will implement singleton pattern properly and will have single static field/property), rather than to initialize every static field inline.

Overall, I think this rule amply demonstrates the usefulness of static code analysis rules. This one rule

  • Identifies potential performance problem in code
  • Provides extra educational value (I bet you have learned something new about static initialization in .Net :)
  • Has added value in automated code review for design flaw detection

As usual you are welcome to blast my opinion or voice your agreement in comments to this post.