Saturday, May 09, 2009

Work Item customization tidbits: custom controls (part 14 of X)

In one of my previous posts I mentioned that I consider custom controls in WI one of the most complex types of customization to implement. Since I got asked related question let me expand on the topic.

Custom work item controls provide a way to implement truly specialized behavior for WI, by writing managed class conforming to well-known interface. Sometimes it may be very tempting to write the logic in C# instead of learning intricacies of WIT XML syntax (and sometimes there is no alternative).

Why is this type of customization so complex? Because you have to code, integrate, test & deploy additional component, and that in a way different from other WIT customizations in XML. And not only that - consider the following important drawbacks custom control has:

  • Additional version of the control needs to be implemented if you want to support the same logic in Web UI as in Visual Studio environment
  • Custom control is not supported when editing WI in Excel (or MS Project)
  • Custom control assembly needs to be deployed on every client machine (or on Web server if the custom control targets Web UI)

All of the above means that custom WIT control should be implemented only when you have absolutely no other answer to outstanding business requirement.

For further information there is extensive summary article on the topic by Ognjen Bajic. Another interesting article by Neno Loje provides additional details on customizing Work Item types depending on the client (WinForms or Web), which is very relevant for custom controls.

Related posts:
- Work Item Customization: limits of complexity (part 13)
- Work Item Customization: estimate the effort (part 12)
- Work Item Customization: customization and global lists (part 11)
- Work Item Customization: customization process (part 10)
- Work Item Customization: customization tools (part 9)
- Work Item Customization: special fields (part 8)
- Work Item Customization: fields maintenance (part 7)
- Work Item Customization: global lists (part 6)
- Work Item Customization: system fields (part 5)
- Work Item Customization: user interface (part 4)
- Work Item Customization: state transitions (part 3)
- Work Item Customization: conditional field behavior (part 2)
- Work Item Customization: fields definition (part 1)

Mirror from MSDN blog

Wednesday, May 06, 2009

Work Item customization tidbits: limits of complexity (part 13 of X)

Today I’d like to talk about WIT customization recommendations that will mostly become applicable as your custom Work Item types increase in complexity.

Keep the number of custom fields limited (per TFS server)

One can have a maximum of 1024 fields defined per Team Foundation Server (as every field is represented by a column in SQL Server table, the limitation is that of maximum number of columns per table in SQL Server). That means that if you define new fields (FIELD with the distinct refname attribute) per WIT, you can easily hit this limit after creating a few complex Work Item types. Once the limit is reached, you have to deal with fields maintenance chores (you must delete some of the fields, and to delete them the fields must not be used in any WIT) – not a lot of fun when what you actually tried to achieve was to create new template.

How do you prevent this problem from occurring? Reuse is the key here – remember that even though it may look like you define a new field per Work Item type, fields are (precious) server resource; and even if the same field is used in WI you can specify different behavior for the same field in a different WIT.

Keep the number of rules limited (per Work Item Type)

While you can create multiple rules in WIT, be aware that rules not only affect maintenance complexity (you have to make it work ;), but also affect the performance. So your users may experience less than stellar performance when they create or modify work items. And there is an additional consideration which I will expand upon in the next section, which is called

Keep the number of WI types small (per Team project)

While there is no hard limit on the number of WIT you can create in one Team project, there is technology limitation (SQL Server again!) on how much complexity one may have per project, with numeric complexity index in this case being defined as [Number of rules in WIT] x [Number of WIT in project]. When you have too many WIT (or few of very complex ones) you may hit a limitation of maximum size of columns in SQL Server statement (65,535). It turns out all rules you define in WIT in Team project are eventually represented as part of real complex SQL statement used for WI validation when changing its data (read more techy details in this forum post by Amit Ghosh)

Keep the number of reportable fields small (per TFS server)

If you are not planning on including the fields into SQL Reporting reports, do not mark fields reportable just for the heck of it, since the reportable fields will propagate into TFS data warehouse and that would add extra in terms of performance and space on your TFS data layer.

By the way, to really understand how reporting in TFS works (and how it fits in a big picture) read this excellent post from Vince Blasberg.

In conclusion, I’d like to highlight once more the importance of having test environment whereto you deploy the potential WIT changes prior to production rollout. Consider the situation where you have just deployed new WIT to a Team project, and as a result the users cannot update any WI in the project. Not a happy place to be, is it?

Related posts:
- Work Item Customization: estimate the effort (part 12)
- Work Item Customization: customization and global lists (part 11)
- Work Item Customization: customization process (part 10)
- Work Item Customization: customization tools (part 9)
- Work Item Customization: special fields (part 8)
- Work Item Customization: fields maintenance (part 7)
- Work Item Customization: global lists (part 6)
- Work Item Customization: system fields (part 5)
- Work Item Customization: user interface (part 4)
- Work Item Customization: state transitions (part 3)
- Work Item Customization: conditional field behavior (part 2)
- Work Item Customization: fields definition (part 1)

Mirror on MSDN blog

Saturday, April 11, 2009

Work Item customization tidbits: estimating the effort (part 12 of X)

My apologies for a long silence on the subject of the series (due to several recent events) but hopefully now am back on the track and I have a long back log :)

In my previous posts I have discussed various bits that are important know before taking on Work Item types customization. Today I’d like to talk more about approaching the whole process.

I would like to advocate a conservative approach, since in most organizations (at least in my experience) there are limited resources dedicated to customization, users support and maintenance of Work Item types.

The easiest way to jump-start the customization process is to use one of the existing templates; I’d recommend stock templates coming with TFS (MSF or CMMI); however, nowadays there are other decent templates available (for example, Conchango Scrum is well known and widely used). At the very least, that provides you with minimum work item logic implemented in professional manner.

To understand the customization effort required, it is helpful to review the following:

1. Detail new data fields to be added to those existing in Work Item type; note if existing fields rules need to be modified

2. Identify the work item state lifecycle desired and how it compares with the existing one for Work Item type (mostly paying attention to the flow rather than to the states names).

3. For your new custom fields, see if there is any special logic to be implemented viz. 

  • Whether field rules are to be scoped by user/group
  • Whether field rules are to be scoped for different states
  • Whether field needs to be associated with static/dynamic list of values

Once you create mapping table of the desired vs. existing fields, these data may be used to estimate the complexity of the development & maintenance. I have tried to compile (somewhat biased) complexity list of elementary field customization task (ordered by the simplest to the most demanding):

i. New data field. Simplest customization possible both from the point of implementation and subsequent maintenance. May require additional effort if the field is to be reported on (since the integration into reports will be required)

ii. Data field with lists of values (local or global lists). For static (i.e. rarely updated) lists of values (such as priorities), both the implementation and maintenance are fairly simple. However, if the lists content is dynamic (such as customers), make sure you plan for maintenance and, more importantly, do not make any assumption as to list content in fields’ rules.

iii. Data field with static rules logic (no dependency on state/user). Since rules implemented may be pretty complex, the scenario is as complex as you made it from the point of implementation complexity. And depending on how well you test the implementation, maintenance may range from nightmare to none.

vi. Data field with rules logic dependent on state transitions. When rules are defined include dependency states lifecycle, that generally means that you need to put extra effort into testing (for large states chart the effort may be very significant) and require regression testing when the state lifecycle is modified.

v. Data field with logic dependent on user/group. When rules are scoped to specific groups (rarely to users in corporate environment), the complexity of environment may have a bearing on WIT. Namely, in Active Directory environment with multiple levels of inclusion between groups it might not be easy to diagnose why your rules function incorrectly (either from the point of being too loose or too restrictive). Extra maintenance may well be expected.

vi. Data field with custom controls. When your data field in addition to rules expressed in WI Type definition has logic defined in custom control assembly, you have just added extra dimension on implementation, testing and maintenance. That becomes even more complex task if the custom control should work for Web interface

Once you identified the work to be executed, you will be able to plan effort required for implementation, testing, deployment and maintenance.

In conclusion, I’d like to highlight two very important principles which when followed will prevent a plethora of issues: a) never deploy to production before deploying to test environment and b) plan and execute the whole WI Types customization process as if it was an ordinary software development effort.  

Related posts:
- Work Item Customization: customization and global lists (part 11)
- Work Item Customization: customization process (part 10)
- Work Item Customization: customization tools (part 9)
- Work Item Customization: special fields (part 8)
- Work Item Customization: fields maintenance (part 7)
- Work Item Customization: global lists (part 6)
- Work Item Customization: system fields (part 5)
- Work Item Customization: user interface (part 4)
- Work Item Customization: state transitions (part 3)
- Work Item Customization: conditional field behavior (part 2)
- Work Item Customization: fields definition (part 1)

Mirror from MSDN blog

Wednesday, April 01, 2009

TFS Administrator chores – space offender strikes again!

In my previous post I talked about management of large files in TFS version control database. Today I’d like to talk about what you can do to optimize space management in work item tracking database.

As you know, it is possible to add file attachments to Work Item, with the maximum attachment size of 2Mb (by default); but most people who use attachments with WI change that limit to something larger (this MSDN article details how to change the maximum attachment size), since default frequently does not suffice for video captures and such.

Which naturally brings us to the question – if the maximum size set, say, to 32 Mb, how could one prevent misuse of the attachment feature?

There is nothing in Team Explorer UI to help you with figuring out the size of the added attachment; and nothing to prevent a user from adding however many large attachments (if they are not greater than maximum size). That leaves you with user education as a form of prevention; and to report the usage it is possible to run raw SQL on the relational database (all of the below queries are strictly AS IS etc.):

-- Query WIT database
USE TfsWorkItemTracking;
SELECT 
    -- parent work item 
    ID AS WorkItemID, 
    -- name of the attachment file
    OriginalName AS AttachementName, 
    -- attachment comment 
    Comment, 
    -- file size
    [Length] AS [Size], 
    -- whether attachment was deleted
    CASE WHEN RemovedDate = '01/01/9999' THEN 0 
              ELSE 1 END AS Deleted 
FROM WorkItemFiles    
    WHERE 
    -- File attachments only
    FldID = 50
    -- return only large files
    AND    [Length] > @LargeFile 

The query will give you the list of WI with large attachments, so you could figure out whether this feature is used in a sensible way.


If you look at the query closely, you’ll notice that the attachment in the database can be removed from WI and still exist in the database. What does that mean, say you? Whereas with version control one can delete item (where the item still will be in DB) and then destroy it (where item will be purged from DB), there is no such feature with Work Item attachments.


It turns out when you delete attachment from Work Item, the actual content is never deleted from database unless you do it manually. There is even helpful but incredibly well-hidden and vague article in MSDN on the subject, titled “How to: Delete Orphaned Files Permanently”.


That means even if you have managed to delete large attachments from WI, your job to recover the space is still half-done, and you need to actually delete the attachment content from the database.


The query below will enumerate all orphaned (deleted from Work Items, but still in DB) attachments, whereas subsequent query can be used to actually purge the deleted items from the database.


-- Query for all orphaned attachments
SELECT WorkItems.ID AS WorkItemID, 
        WorkItems.OriginalName AS AttachementName,
        WorkItems.Comment 
FROM TfsWorkItemTrackingAttachments.dbo.Attachments Attachements, 
        TfsWorkItemTracking.dbo.WorkItemFiles WorkItems
    WHERE Attachements.FileGuid = WorkItems.FilePath 
        AND WorkItems.RemovedDate <> '01/01/9999'
        AND WorkItems.FldID = 50


-- When absolutely sure - delete the orphans
DELETE 
    FROM TfsWorkItemTrackingAttachments.dbo.Attachments
-- join to WIT tables to identify orphans
WHERE FileGuid IN (SELECT FilePath 
        FROM TfsWorkItemTracking.dbo.WorkItemFiles
        WHERE RemovedDate <> '01/01/9999'
        AND FldID = 50)

Purging orphans seems to me a good candidate for the recurring job (not sure why it is not part of core TFS setup).


Mirrored from MSDN blog

Tuesday, September 23, 2008

Work Item customization tidbits: customization and global lists (part 11 of X)

In the previous post I have talked about setting up customization process, and I have received the question that merits separate post as the answer.

The question was – how do you figure in global lists into WI customization?

When you export WI type definition (either using witexport or Process Template Editor power tool), there are two options available:

1. Export WI type with no lists. This is the default mode of witexport; if you use PTE, you will be prompted (“Would you like to include the Global List definition?”)

2. Export WI type with lists (/exportgloballists parameter of witexport or answering yes on PTE prompt)

In the first case, the WI type XML file produced will not contain any lists but the fields will still reference the lists. In the second case, the WI type file will contain all (not only those referenced) global lists in addition to WI definition (and if you export that definition, these lists will get created as if you have used glimport).

In both cases, the WI type definition file will contain references to global lists. If you are going to put the file into version control (especially if you retain one copy of WI type definition for all similar Team Projects), reference Team Project specific lists (such as Builds list) ought to be removed. Then the only lists referenced will be ones global across different projects.

At any rate, including global lists definitions in WI type files is a bad idea, since when WIT is imported the global list defined inline will override the existing global list values.

Overall, I feel that it is much better to separate global lists from custom WI types. Also, it may be helpful to use some naming convention (for example, <Team Project name> - <list name>) to distinguish between lists specific to certain Team Project and truly “global”.

It is also worth to keep reusable lists in version control alongside with custom WI type definitions (especially when you have multiple TFS servers); that way you can easily (re-)create all required global lists with glimport before creating customized WI types (and that’s an important point here – global lists should exists before you create new Team Project that contains WIT referencing those global lists).

Personally, I never had too much trouble with global lists in customization context. Being pedantic and keeping in mind the points mentioned above worked for me most of time.

Related posts:
- Work Item Customization: customization process (part 10)
- Work Item Customization: customization tools (part 9)
- Work Item Customization: special fields (part 8)
- Work Item Customization: fields maintenance (part 7)
- Work Item Customization: global lists (part 6)
- Work Item Customization: system fields (part 5)
- Work Item Customization: user interface (part 4)
- Work Item Customization: state transitions (part 3)
- Work Item Customization: conditional field behavior (part 2)
- Work Item Customization: fields definition (part 1)

Thursday, September 11, 2008

Work Item customization tidbits: customization process (part 10 of X)

In the previous post I have talked about the tools to modify Work Item type definitions. Today I’d like to relate to overall process of changing WIT definitions using those tools.

Are you sure that all of thirty Team Projects have the same WI definitions? How do you propagate the changes across project templates or live projects? How do you ensure that the latest change to WI is working? If you have definite answers to those questions, then you have something that may be nicknamed “process”; otherwise you are living on borrowed time and the disaster is waiting to happen.

Let me start with the development environment set up for Work Item type customization. Yes, that’s correct – authoring definitions in XML is not different from traditional writing software. If anything, it is easier to cause large scale problem across your company infrastructure with bad WI type than with custom developed tools (imagine as an example, that new bug definition cannot be saved due to the flaw in WIT logic, or bug cannot be closed, or the automatically update field values are not updated, and then project those examples on X, XX or XXX users environment).

The first principle of WI customization – never develop or deploy at the production server; have it first in the test environment. The easiest way to have test environment is to set up a Virtual PC image (or other virtual image) to work with; the hard thing with this approach being maintaining the image in sync with your production environment (unless you copy production environment into virtual image as needed and use it as your test environment; this approach is the best one when you have appropriate virtualization technology and hardware).

The second principle of WI customization – always verify that changed WI type logic does not break the existing data. That’s why I emphasized above the importance of test environment reflecting the production data; you must have the data you can test with. One frequent example of “breaking” customization is making certain previously obscure and not widely used field mandatory – suddenly every user saving existing work item is faced with updating that field.

And lastly, test custom WI type the same way you test the software. If you have specified twenty states and transitions between those states and defined conditional logic based on state transitions, now you have to achieve high “code coverage” on your definitions. It is worth to keep the future testing burden in mind when making implementation decisions. The testing become even more important if you choose to implement custom controls; in that case you actually develop custom code that needs to be tested and entails integration & deployment testing for your work item template.

Another important aspect of development process is version control. Make sure that every customized project template or WI type is stored in version control; that assures that rolling back changes or tracking changes history is possible and easy. Establishing version control repository update as a necessary step for production deployment also helps in fighting the temptation of committing changes directly to production environment (updating WI types online is a very dangerous feature of Process Template Editor; I’d recommend always using PTE in conjunction with version control and XML files).

Once the definitions are stored in version control repository, it is also easy to script automatic deployment of changed WIT across live Team Projects. I am talking about scenario where same change needs to be propagated across several Team Projects; if you use script (and store it in version control repository) you can document all changes performed and make sure that all required projects are updated.

And finally, very important aspect of customization is human factor. Theoretically, everyone with TFS Admin or Project Admin permissions may run witimport and update Work Item definitions (or use Process Template Editor to perform changes in UI). I’d strongly advise against set up where Work Item customization is performed by every team independently; for the reasons above custom work items development (as any software development) requires certain level of dedication and expertise. In the very least, I’d assign several persons to review changes prior to being deployed to production; after all, the database is shared between all teams.

To summarize, WIT customization process principles are:

  • Always perform development/initial deployment in the test environment
  • Make sure test environment have WI database similar/identical to production environment
  • Test custom WI types as you would test your software
  • Use version control on process templates and WI types; never deploy a definition that is not stored in repository first
  • Automate and document changes deployment
  • Establish clear roles and responsibilities

The overall process may seem cumbersome, too time-consuming and paranoid, but compare that with your software development. Software is not released untested, using appropriate test environment is paramount, developers need to have certain qualification etc. Why would Work Item customization be different? After all, it directly affects your daily development process and its efficiency.

Related posts:
- Work Item Customization: customization tools (part 9)
- Work Item Customization: special fields (part 8)
- Work Item Customization: fields maintenance (part 7)
- Work Item Customization: global lists (part 6)
- Work Item Customization: system fields (part 5)
- Work Item Customization: user interface (part 4)
- Work Item Customization: state transitions (part 3)
- Work Item Customization: conditional field behavior (part 2)
- Work Item Customization: fields definition (part 1)

Thursday, September 04, 2008

Work Item customization tidbits: customization tools (part 9 of X)

After a short recess, it is time to get back on track with WIT customization topics – I still do not know how many parts I have yet to write!

Today I would like to talk about tools that can be used to modify Work Item types.

Before getting to the tools specifics, it is important to understand that Work Item types may be modified in two different manners.

The easiest way is to modify Work Item type definitions that are parts of Team Project template (for that you will need to export the template, modify it and then either import it back or create a new one) and create new Team Projects based off the modified template. In such manner, you can easily establish same project definitions across different projects.

However, in many (or perhaps even all) cases it is impossible to come up with perfect Work Item definition up front. Certain fields become deprecated or new ones need to be added, business logic changes, requirements to the data input are modified. That means that WI types will have to be updated both in the project template and in existing Team Projects.

For both of these approaches you have a choice of using either stock VS/TFS tools or additional toolset. The “standard” tools are as following

  • Process Template manager allows managing Work Item types as part of Team Project template (download existing template, and upload new template with WIT contained)
  • Command-line utilities witexport and witimport let you export existing Work Item type definition and import changed Work Item type to Team Project
  • Global lists can be managed by using glexport/glimport command-line utilities (see more on global lists in the previous post)

Using all of these tools involves editing Work Item type definitions XML files, and editing XML files requires intimate knowledge of the schema. An alternative to these tools is Process Template Editor which is distributed as part of Team Foundation Server Power Tools suite. Further in this post I will do a quick review of the features PTE has to offer.

Process Template Editor provides more than just editing of Work Item types. You can use it to author whole project template, WI types included (to learn more about using PTE for that, look for the extensive document on PTE features available it Power Tools folder – usually at location like “C:\Program Files\Microsoft Team Foundation Server 2008 Power Tools\Process Template Editor\PEUserGuide.doc”). I will concentrate only on WIT related functions.

Process Template Editor may be accessed only from Visual Studio tools menu:

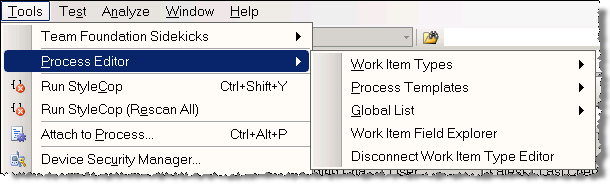
Important feature of PTE that is visible right from the menu is disconnected mode: you can choose to work connected to Team Foundation Server (and load Work Item types, global lists etc. from the server) or disconnected (using local XML files with corresponding definitions).

Speaking of local XML files, PTE supports the same functions as provided by witimport/witexport and glimport/glexport (that is export of entities to and import of entities from file), which plays quite nicely with disconnected mode.

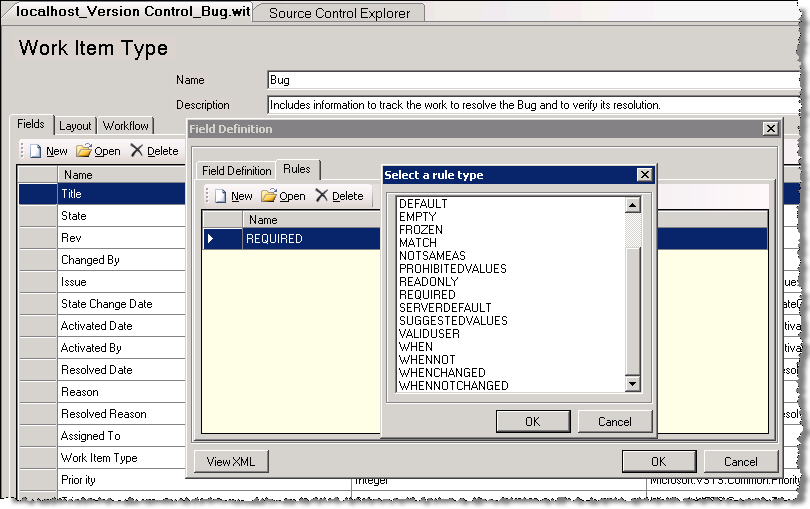
But no matter how you choose to access WI type (from local file or from server), WI type editor GUI is probably most important feature of PTE. The editor displays three tabs that handle different parts of WI definition schema.

“Fields” tab roughly maps to FIELDS section of WI type, and allows definition of fields and type-wide fields behaviors:

"Layout" tab maps to FORM section, and there you can define WI type UI. The awesome feature (that alone justifies usage of PTE in my eyes) is the ability to preview the form right after changing layout and without submitting changes to the server.

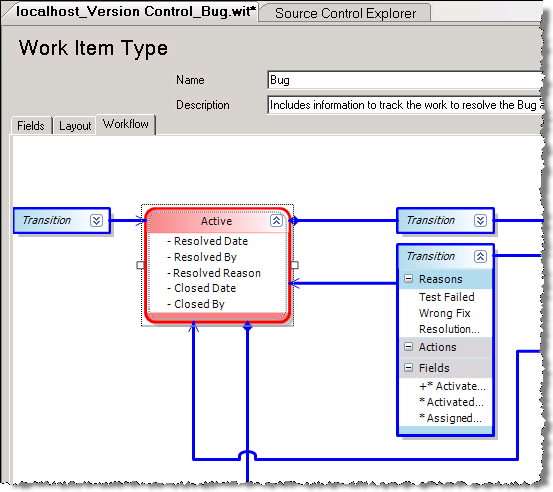
And the third tab, "Workflow" maps to WORKFLOW section in WI type and defines states, transitions and state-/transition-related fields behavior. The diagram can be used to visualize the future work item lifecycle:

Those three tabs together provide complete break up of WI type definition, so you can define the whole of WI in PTE - with one caveat is that some of the advanced attribute combinations may not work at all times; there were known bugs around certain scenarios (I highly recommend latest version of Power Tools due to multiple fixes in PTE as compared to VS2005 version). However, for visualization of workflow PTE cannot be beaten.

Simple and yet helpful UI is available for editing global lists (where you can define new list or modify contents of existing ones):

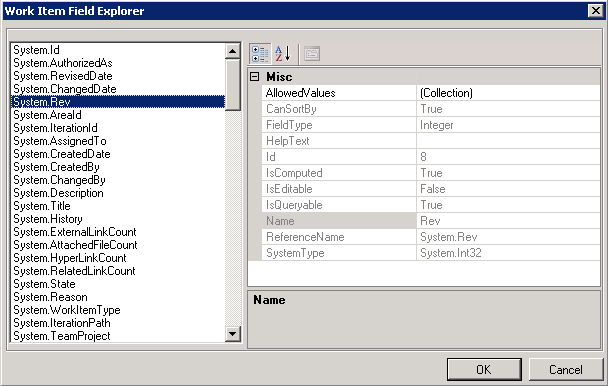
And finally, using PTE you can review available fields and their properties using Field Explorer (parallel to command-line witfields command):

Thus, using Process Template Editor one is able to achieve the same ends as with VS/command-line tools combination. Whichever tools you use is a matter of a personal preference; myself, I have found that using XML editor I can change WI type several times faster compared to PTE. However, for maintenance or review visual GUI of Process Template Editor is very helpful.

It is worth noting, that updating WI types at the server requires administrative permissions (Server or Project administrator). And that leads me to the topic for the next post, on how to manage the customization to work item templates responsibly. After all, managing WI data is on par (if not more important) with managing the source code assets.

Related posts:
- Work Item Customization: special fields (part 8)
- Work Item Customization: fields maintenance (part 7)
- Work Item Customization: global lists (part 6)
- Work Item Customization: system fields (part 5)
- Work Item Customization: user interface (part 4)
- Work Item Customization: state transitions (part 3)
- Work Item Customization: conditional field behavior (part 2)
- Work Item Customization: fields definition (part 1)

Monday, July 28, 2008

Work Item Customization tidbits: Special Fields (part 8 of X)

Before you consider customizing work items, you probably should be aware of existence of the “special” fields, that behave differently from the custom ones you define. In most cases you will have to use the special fields in your custom type, so to understand peculiarities of the behavior is pretty important.

Most of those fields are defined in System.XXX refname space (I will omit the namespace specifier for all System fields below); let me enumerate them and detail their behavior.

Read-only fields are always available for all work items, and yet you do not have to do anything to define them. The fields are:

  • Id – work item unique (within TFS server) identifier
  • TeamProject – work item Team project name
  • WorkItemType – work item type name
  • CreatedBy – user who created WI 
  • CreatedDate – datetime of WI creation

Calculated fields relate to work item links (set in LinksControl  and AttachementsControl in UI). The names are self-descriptive:

  • AttachedFileCount – number of files attached to WI
  • HyperLinkCount – number of links (URLs) in WI
  • ExternalLinkCount – number of links (version control artifacts) in WI
  • RelatedLinkCount – number of links (to other WIs) in WI

Auto-updated read-only fields are different from read-only fields as they are updated every time work item is changed:

  • ChangedBy – user who last changed the work item
  • ChangedDate – datetime of the last change
  • Rev – current revision of work item

And now, very special fields – so special that they represent a category onto themselves.

AreaPath/IterationPath fields – represent WI area/iteration. Those tree values are represented as tree in UI and can be displayed only in WorkItemClassification control. Not all behaviors are applicable to those fields (for example, they cannot be made mandatory)
And most importantly, those fields are basis for WI grouping and security model, and as such are provided separate dedicated UI. In that UI one is able to view or modify areas/iterations as well as assign permissions to them. By allowing WORK_ITEM_WRITE/WORK_ITEM_READ, it is possible to control whether certain groups of users may edit/view work items (and whatever WI appear in the WIQL reports).

State field has its values and behavior defined in dedicated WORKFLOW section.

Reason field is also defined in WORKFLOW section and its values are dependent upon state. It becomes enabled only on state change, and its behavior cannot be changed.

History field cannot be modified or used in any way except for display in WorkItemLogControl; no other behaviors are supported (by the way, similar display controls – LinksControl for WI links, and AttachmentsControl for WI files attachments – do not even have associated fields, only UI controls)

And finally, there are not so special but yet very important System fields that are recommended for use in every work item – Title (for work item title), Description (for WI textual description) and AssignedTo (for user assigned to specific WI).

Additionally, I would like to mention fields defined in different Microsoft.VSTS.XXX namespaces, that you should consider using when customizing your work items. For those fields, you do not get extra behaviors as for some of System.XXX fields, but out-of-the-box templates can be used as a good example of usage for those common fields and provide an easy start for customization. I will list several most interesting fields:

Microsoft.VSTS.Common fields

  • StateChangeDate – date of the last state change
  • Rank – work item priority (numeric)
  • ActivatedBy/Date – date the work item becomes active (and who activated it)
  • ClosedBy/Date – date the work item becomes inactive (who deactivated it)

Microsoft.VSTS.Scheduling fields

  • StartDate – date of WI (task) start
  • FinishDate – date of WI (finish

Microsoft.VSTS.Build fields

  • FoundIn – build the WI discovered in
  • IntegrationBuild – build the WI was first integrated in

FoundIn and IntegrationBuild fields provide most interesting automated behavior connected with builds. When you perform a first build in Team Project, global list with the name “Builds - [Team Project name]” is created by TFS and is associated with the fields in all work item types in the project (using SUGGESTEDVALUES behavior). The mechanism uses TFS eventing model (see the detailed post by Jason Prickett). After the list is created, each subsequent build is added to that global list and in such way available for selection in work items.

Related posts:
- Work Item Customization: fields maintenance (part 7)
- Work Item Customization: global lists (part 6)
- Work Item Customization: system fields (part 5)
- Work Item Customization: user interface (part 4)
- Work Item Customization: state transitions (part 3)
- Work Item Customization: conditional field behavior (part 2)
- Work Item Customization: fields definition (part 1)

Wednesday, July 16, 2008

Work Item Customization: fields maintenance (part 7 of X)

When discussing work item type fields definitions, I have intentionally left out the maintenance aspects (to simplify things). Now let us handle some of the complexity related to field definitions.

It is important to understand that all fields defined per work item type are actually defined per Team Foundation server. Defining field in work item may be likened to adding new record to fields’ “global table” (containing name, refname and type columns) with all work item types using that global table. Thus when field is renamed (using witfields rename utility), its name changes for all work item types using that field

Moreover, when you add field to your work item type, and some work item type has already used the same refname, you cannot override either data type or field name. And the following additional constraints apply:

  • When field is removed from specific work item type, it does not cease to exist on server (even if it is not used by any work item type); to remove field it needs to be explicitly deleted
  • When field is being deleted (using witfields delete), it should be first removed from all work item types
  • When the field deleted was used for reporting (reportable attribute set), then you will have to rebuild data warehouse to purge old field and its values

Just imagine that you have created custom work item type and it uses certain field (CR_ID, integer, reportable), then used it in twenty Team projects. If now you need to change field CR_ID type from integer to string, that will involve the following:

  • Remove field from WI type definition in all twenty projects
  • Delete field from WIT database
  • Rebuild data warehouse
  • Add field to WI type definition in twenty project

Did I bring my point home – the point being field maintenance (add/delete and to a degree rename) is expensive? The morale of the story is that if you are going to add new field and especially if you desire to delete field, “measure twice, cut once”. Sometimes it may be better to leave unused field (that is not currently used by any WI type) hanging in there rather than going for deletion spree.

Saturday, July 05, 2008

Work Item Customization tidbits: global lists (part 6 of X)

In previous installments on work item customization, I talked more about general syntax of custom work item types and less about how this syntax is applied. Today I’d like to talk about WI syntax that can be used to minimize complexity in maintaining custom work item types.

One way to simplify the maintenance across different work item types is to have some definitions global to Team Foundation server. TFS WIT provides such mechanism aptly called global lists. Global list is exactly what its name says - list of values global to Team Foundation server; by global I mean that it can be used by any work item types on the server.

Let’s digress for a moment into details of list definitions in work item templates. To define the list box in work item (some call it combo box), one needs to do the following:

  • Define field with one ALLOWEDVALUES/SUGGESTEDVALUES multiple values specifier
  • Associate the field defined with FieldControl in UI

Now if we define list field, how it can be modified to use a global list? Let’s start with Priority field as defined in MSF bug work item template:

<FIELD name="Priority" 
      refname="Microsoft.VSTS.Common.Priority" 
      type="Integer" reportable="dimension">
  <ALLOWEDVALUES>
    <LISTITEM value="1"/>
    <LISTITEM value="2"/>
    <LISTITEM value="3"/>
  </ALLOWEDVALUES>
</FIELD>

Leaving aside specifics of global list definitions, assume for a moment that we have global list called “Priorities” containing values 1, 2, 3 defined; then Priority field can be defined as following:

<FIELD name="Priority" 
      refname="Microsoft.VSTS.Common.Priority" 
      type="Integer" reportable="dimension">
  <ALLOWEDVALUES>
    <GLOBALLIST name="Priorities"/>
  </ALLOWEDVALUES>
</FIELD>

Now if priorities list needs to be changed across all work item definitions, it is sufficient to change one global list. The scenario is also flexible enough to allow modifying single template without affecting the rest; the following definition uses combination of global list and values specific to current template:

<FIELD name="Priority" 
      refname="Microsoft.VSTS.Common.Priority" 
      type="Integer" reportable="dimension">
  <ALLOWEDVALUES>
    <GLOBALLIST name="Priorities"/>
    <LISTITEM value="Undefined"/>
  </ALLOWEDVALUES>
</FIELD>

The global list may be defined in two ways – either as part of work item template or separately using glexport/glimport command line utilities (in the latter case, global list is represented as xml file). Several caveats to be aware of when defining and using global lists:

  • Global list values cannot be modified (only replacement of the whole list is supported); when you include global list definition in WI template or use glimport, if the list exists the whole list will get replaced. For that reason, I do not recommend placing global list definitions into WI template but rather to create global list prior to using it in any templates (make sure you modify templates that you get through witexport; witexport will always include related global lists in work item definition)
  • Global list cannot be deleted (there exists a workaround - if you are using VS2008, Power Tool destroygl can be used for the purpose)

One additional important scenario that global lists help in solving is bringing external data over to TFS Work Item Tracking system. Suppose that you need to have list of project codes from external system (f.e. payroll) available in TFS work item; and the catch is that the list is updated in external system every now and then. The first step is obvious – define the project codes list as a global list, and make sure all work item templates use it. The second step is to make sure the global list gets updated when new projects are added in external system. Simplest solution to this would be to import list of project codes into XML file from external system and schedule glimport to run overnight. Or for more complex situations, one could use TFS extensibility API (most notably ImportGlobalLists method of WorkItemStore) to write custom updater.

To conclude, while using global list may require some extra thought in designing custom work item types, the benefits you’ll reap in maintenance are huge.

Related posts:
- Work Item Customization: system fields (part 5)
- Work Item Customization: user interface (part 4)
- Work Item Customization: state transitions (part 3)
- Work Item Customization: conditional field behavior (part 2)
- Work Item Customization: fields definition (part 1)

Friday, June 27, 2008

Work Item Customization tidbits: System fields (part 5 of X)

Today I would like to talk about system fields that must be present in every work item.

All of those fields have refname System.XXX and are available for any Microsoft Work Item template (both in CMMI and MSF templates). They represent minimal recommended subset of fields that any custom work item template should contain. Having such common subset allows reusing basic WIQL queries or reports from pre-defined templates with your custom templates.

You will notice that for most of those fields the ability to customize their behavior is extremely limited (except for UI-related properties). This is an important limitation one should be aware of when designing custom templates; usually you will just duplicate logic and definitions available in out-of-the-box WI templates for those fields (and that would be a recommended approach since there are almost no supported behaviors to apply anyway).

Let’s have a look at system fields by the category:

Core fields

Those are the fields that you will never update through UI, and in most cases will use only for WIQL queries or reports

  • ID - unique (across TFS Server) ID for the work item, that gets assigned when you create work item
  • Team Project - Team Project that work item belongs to
  • Work Item Type - Work Item Template name that was used to create a work item
  • Rev - work item historical revision (for newly created WI it is 1, and gets incremented with every change)
  • Linked artifacts count fields provide number of artifacts linked to the WI. The following fields are available: Attached File Count, External Link Count, Hyper Link Count, Related Link Count

You do not need to define any of those fields in your WI template (with the exception of ID field); they will be available for queries on any WI template you create.

As a footnote, it is worth mentioning that attachments and links do not have corresponding fields; you just place an appropriate control in UI and magically attachments/links become supported. The only fields related to this functionality are custom Count fields mentioned above (that means no linking queries are supported in current version; this is killer feature coming up in the next version of TFS).

Special behavior fields

Those fields have specific behavior associated with them, with this behavior being  part of the WI template definition syntax and either having dedicated customization mechanism (e.g. State field) or no customization available (e.g. for History field only UI properties can be changed).

  • State – the state field values and behavior are defined in WORKFLOW section; the only general behavior that can be applied to state field is READONLY (i.e. state may be set read-only depending on certain condition, and thus WI status cannot be changed)
  • Reason – the reason field values and behavior are also defined in dedicated WORKFLOW section; likewise the only generic field behavior supported is READONLY
  • History - the field contains the history of WI (each entry contains all fields changed, timestamp and optional comment). The only usage is to display it in WorkItemLog control; no rules can be defined on this field and basically it is display only
  • Area Path - the field represents assigned area. Area path can be displayed only in WorkItemClassification control, and supports only limited subset of generic field behaviors
  • Iteration Path - the field represents assigned iteration. Iteration is also may be displayed only in WorkItemClassification control, , and supports only limited subset of generic field rules

Audit fields

The auditing fields are usually updated automatically and are read-only in UI (though this behavior can be customized, generally it is not a good idea):

  • Created By/Created Date - the user that created WI and creation date
  • Changed By/Changed Date - the last user that changed WI and change date
  • History field can be also considered an audit field, but its behavior cannot be modified (history is always updated automatically).

Data fields

The data fields are the fields that are usually present in any work item template, independent of work item purpose. Indeed, any work item will have short/long text description and person responsible for that unit of work:

  • Title – work item title
  • Description – work item description
  • Assigned To – currently assigned user

As a conclusion, it is important to note that those common fields already defined in data warehouse so in addition to WIQL you can perform reports on them without any additional setup.

Related posts:
- Work Item Customization: user interface (part 4)
- Work Item Customization: state transitions (part 3)
- Work Item Customization: conditional field behavior (part 2)
- Work Item Customization: fields definition (part 1)

Saturday, June 21, 2008

Work Item Customization tidbits: user interface (part 4 of X)

In previous posts I talked about how to define WI fields, fields behaviors and states/transitions logic. Now it is time to talk about how work items UI is defined.

Let’s start with a small example:

<Form>
<Layout>
 <Group>
  <Column PercentWidth="100">
   <Control Type="FieldControl" FieldName="System.Title"
            Label="Title:" LabelPosition="Left" />
  </Column>
 </Group>
  …
 <TabGroup>
  <Tab Label="Description">
   <Control Type="HtmlFieldControl" FieldName="System.Description"
            Label="Description:" LabelPosition="Top" Dock="Fill" />
  </Tab>
  …
 </TabGroup>
</Layout>
</Form>

This example shows several important moments. First, all UI elements should be placed under LAYOUT element which in turn is placed under FORM element.

LAYOUT elements may host GROUP and TABGROUP elements. GROUP element groups child elements and may be viewed as “row” element (also optionally it may have a title). TABGROUP element contains one or more tabs (represented by TAB elements with titles). Both TAB and GROUP elements may contain several levels of nested groups.

To organize elements within a group, COLUMN elements may be used. While GROUP represents a row, COLUMN naturally represents a column and must have width specified (the width may be specified either in percents of total width or in pixels). All basic elements (LAYOUT, GROUP, TAB and COLUMN) have a set of common properties such as Padding and Margin.

Those high level elements are used to organize controls representing the work item fields. Typical high-level UI organization of the form consists of several groups on the top part of the form (displaying general fields common to all work item types such as Title, State, Assigned To etc.) and tab control at the bottom part of the form (with tabs hosting work item specific fields). Here is the screenshot of MSF Agile Bug Work Item:


In addition to common attributes (Padding and Margin), every control has the following attributes:

  • Type specifies how the field data will be displayed (to be discussed later)
  • FieldName specifies what field is associated with the control (refname must be used)
  • Label specifies user friendly descriptive text for the control (it may contain & for mnemonics)
  • LabelPosition specifies how the label should be positioned relative to the control
  • Dock attribute may be used to specify how (if at all) the control should fill the container

The way the data is displayed is defined by the Type specified. There are several predefined types of controls:

  • FieldControl supports plain textual or numeric fields and lists of values (depending on the field it is associated with)
  • HtmlFieldControl supports (optionally) rich format text, possibly multi-line
  • DateTimeControl supports formatted date fields

Additionally, there are several special controls (that can be used only for specific data, and usually are displayed on dedicated tabs)

  • WorkItemClassificationControl is special control used to display hierarchical AreaPath and Iteration fields values
  • WorkItemLogControl displays work item history information (and it does not have associated field)
  • LinksControl displays work item links information (and it does not have associated field)
  • AttachmentsControl displays work item attachments (it does not have associated field as well)

With the basic information above in mind, it is easy to understand the example definition: we have Title text box taking the upper part of the form and underneath there is tab control with a single tab, hosting multi-line rich text box that fills the whole tab area.

For the limited set of UI elements available there is surprising number of customizations one can do. But what is one to do if the UI elements available do not answer the WI customization requirements? There is option to develop custom control providing for that custom logic using .NET, TFS SDK and your language of choice (though the development and deployment experience is not as basic as many would like that to be; we shall discuss it later).

This post rounds off the basics of custom Work Item templates definition syntax. Further I will try to touch upon some less explored corners and common approaches in customization.

Related posts:
- Work Item Customization: state transitions (part 3)
- Work Item Customization: conditional field behavior (part 2)
- Work Item Customization: fields definition (part 1)

Saturday, June 14, 2008

Work Item Customization tidbits: state transitions (part 3 of X)

In the previous posts I talked about field definitions. Now it is time to handle work item status (state) definitions, and how the transitions between different states are defined.

The simplest definition of work item with single state will look as following:

<WORKFLOW>
    <STATES>
        <STATE value="Active"></STATE>
    </STATES>
    <TRANSITIONS>
        <TRANSITION from="" to="Active">
            <REASONS>
                <DEFAULTREASON value="New" />
                <REASON value="Duplicate" />
            </REASONS>
        </TRANSITION>
    </TRANSITIONS>
</WORKFLOW>

The definition consists of two parts – list of states available for work item, and list of transitions between states. In the example above, there is only one state defined, and there is single transition from “” to “Active” (where “” means no state and is applicable only to newly created work items). Another thing to note is the list of reasons defined for every transition. The reason field becomes enabled when user selects to state; then the list becomes relevant with DEFAULTREASON selected.

This simple example amply demonstrates how one can specify list of states available, transitions between them and reasons for the transition performed.

While that simple definition can get one by, how about more complicated scenarios – for example, making fields read-only depending on work item state, or setting default values upon transition? As it is, it can be solved by adding FIELDS section to STATE, TRANSITION or REASON elements.

The state-related FIELDS section is similar to FIELDS section describing the fields available in the work item (as we discussed earlier). However, since all fields were specified previously in WORKFLOW we only need to reference fields and provide desired behaviors. For example let’s look at some TRANSITION definitions from Bug WI template:

<TRANSITION from="Closed" to="Active">
 <REASONS>
  <DEFAULTREASON value="Regression" />
  <REASON value="Reactivated" />
 </REASONS>
 <FIELDS>
  <FIELD refname="Microsoft.VSTS.Common.ActivatedBy">
   <COPY from="currentuser" />
   <VALIDUSER />
   <REQUIRED />
  </FIELD>
  <FIELD refname="Microsoft.VSTS.Common.ActivatedDate">
   <SERVERDEFAULT from="clock" />
  </FIELD>
  <FIELD refname="System.AssignedTo">
   <COPY from="field" 
        field="Microsoft.VSTS.Common.ResolvedBy" />
   </FIELD>
 </FIELDS>
</TRANSITION>

We already understand the intent behind the REASONS section - it specifies that bug can be moved from “Closed” to “Active” either because of regression or as it is reactivated. Without concentrating too much on syntax details, the FIELDS section can be easily read: for Activated By field we want to make sure that it is set by default to the user who performed the transition, the field is mandatory and must be set to valid TFS user name. Activated Date field should be set to the time of the transition (since SERVERDEFAULT is performed when WI is saved), and Assigned To field should default to the value of Resolved By field (or in other words, to the person who resolved and closed the issue).

In a similar manner, FIELDS section may be specified for states or reasons (for example, you may want to make sure that certain field is mandatory only in specific state, or that setting specific reason in transition requires additional information [and thus makes certain fields mandatory]).

To round off the topic of WI states, let us talk about the security. The typical requirement for the task tracking system is limiting the users to certain actions. We have previously discussed how the FIELDS logic can be limited based on user groups; can the state transitions be limited in the similar fashion?

Indeed, we can specify optional for and not attributes in TRANSITION element, allowing (and/or denying) access to certain group to certain states. For example, the following snippet allows reopening of the bug only to testers (and explicitly disallows developers)

<TRANSITION from="Closed" to="Active" 
            for="[Project]\Testers" 
            not="[Project]\Developers">
    …
</TRANSITION>

As denial takes precedence, any tester who is also developer will not be able to move bug to “Active” state.

With this post we have rounded off (admittedly in very simplistic manner) most of the “behind-the-scene” logic of Work Item definition. Next I will discuss how the elements are exposed in User Interface using FORM section.

Related posts:
- Work Item Customization: conditional field behavior (part 2)
- Work Item Customization: fields definition (part 1)

Sunday, June 08, 2008

Work Item Customization tidbits: conditional field behavior (part 2 of X)

In the previous installment I started talking about FIELDS section definitions. While basics were covered, there are still more advanced scenarios to be discussed; such as making certain field rule/behavior (or group of those) conditional based on user or other conditions.

To scope certain rule for specific users, there are for and not attributes exposed on rule elements. Those attributes accept Team Foundation Server group names; for example changing our example in the following way

<FIELD name="Issue" refname="Microsoft.VSTS.Common.Issue" type="String">
    <REQUIRED for="[Project]\Testers" not="[Project]\Developers"/>
    …
</FIELD>

makes the field mandatory only for the users in Team Project specific Testers group (and optional for Developers). The possible values for these attributes may be Team Foundation Server global groups (such as "Valid Users"), Team Project specific groups or Active Directory domain groups/users. If users from several groups need to be specified, common approach is to create TFS group combining those, and use it in the field definitions.

While giving plenty of leverage in scoping the fields' behavior to user groups, those attributes do not provide mechanism for creating dependencies between different fields' values. That kind of conditional behavior is handled by WHEN* elements; there are following elements available:

  • WHEN/WHENNOT – the elements are used to specify pattern "if field A has value B then …, else …" (however, the wording is somewhat different: "when field A has value B then …, when field A has not value B then …")
  • WHENCHANGED/WHENNOTCHANGED – the elements are used to provide logic similar to WHEN/WHENNOT pair; only the logic is tied to the certain field value changing rather than to the field being set to specific value

WHEN* elements are placed under FIELD elements and are used to group certain rules together for the same condition. The following snippet from the Bug template sets "State Change Date" field value to system time when "State" field value changes, and makes sure that the date field cannot be changed in the meanwhile by specifying read-only constraint:

<FIELD name="State Change Date" refname="Microsoft.VSTS.Common.StateChangeDate" type="DateTime">
    <WHENCHANGED field="System.State">
        <SERVERDEFAULT from="clock" />
    </WHENCHANGED>
    <WHENNOTCHANGED field="System.State">
        <READONLY />
    </WHENNOTCHANGED>
</FIELD>

This conditional logic in addition to basic rules provides a whole lot of flexibility. However, it also adds significant amount of complexity. If we consider rules that affect field values (namely DEFAULT and COPY rules) together with WHEN* conditional formatting, it is possible to create unintended chaining of rules (and the way WIT engine handles the rule logic is not that simple to start with).

That about gives very brief overview of how FIELDS section is defined (with the exceptions of data warehouse integration and global lists to be handled later). Next stop is WORKFLOW section – dealing with states and transitions should be pretty exciting!